Compliance standards in Defender for Cloud
Compliance standards in Defender for Cloud represent industry, regulatory, and organizational guidelines used to assess resource configurations across your cloud environment.
Regulatory compliance standards reflect frameworks from industry programs and government regulations.
- NIST SP 800-53: for federal systems.
- ISO 27001: for information security management.
- PCI-DSS: for payment card data.
- DORA: for financial resilience
- EU AI Act for artificial intelligence
The Microsoft Cloud Security Benchmark
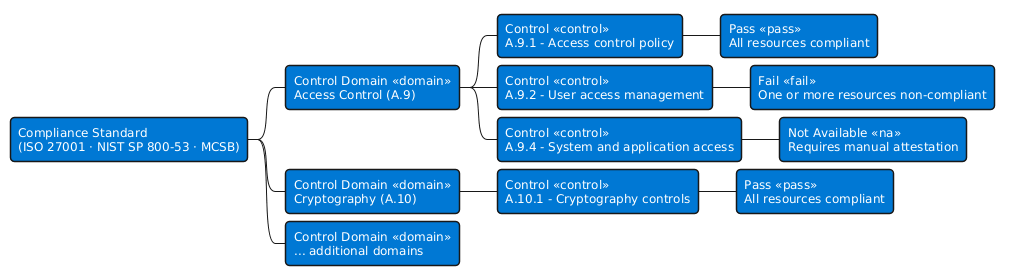
A compliance standard consists of multiple compliance controls logical groups of related security recommendations. Each control represents a specific security requirement from the standard.
Azure and Defender portals
The Azure portal at portal.azure.com serves as the configuration hub for compliance standards. You assign standards to subscriptions, configure scope, manage underlying Azure policies, and create custom standards in the Azure portal. To manage standards and access the full compliance dashboard, Resource Policy Contributor and Security Admin roles are required at minimum.
The Defender portal at security.microsoft.com provides the monitoring interface for compliance status. You view compliance scores, examine control details, filter security recommendations by framework, and track remediation progress in the Defender portal. This portal offers read-only access to compliance data, making it ideal for security operations teams who monitor compliance without managing policy assignments.
Assigning compliance standards is only the first step in building a compliance program. The real work begins when you investigate which controls are passing, which are failing, and what actions you must take to close the gaps.
The regulatory compliance dashboard provides a centralized view of your organization's compliance posture across all assigned standards. You access the dashboard through the Defender portal at https://security.microsoft.com by navigating to Cloud security > Regulatory compliance.
Investigating a failing assessment
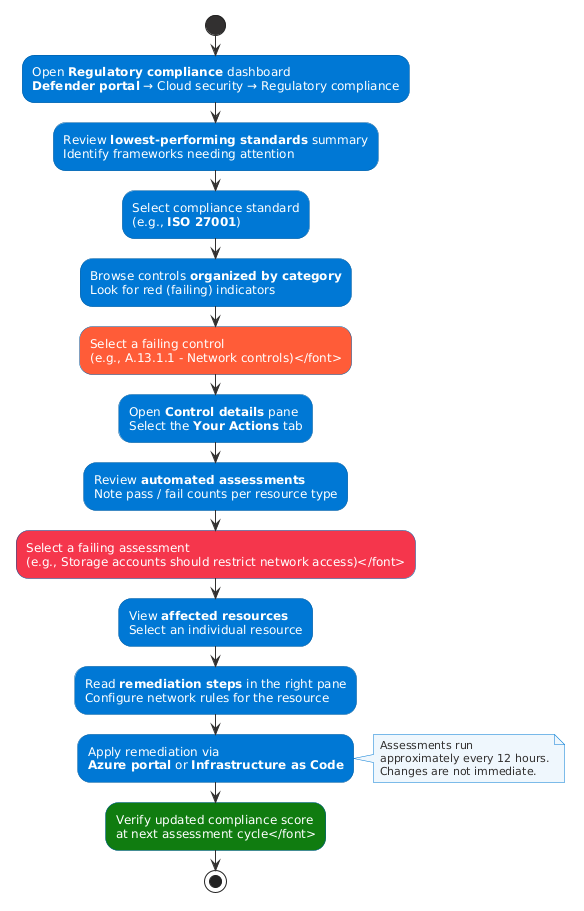
The following diagram shows the full investigation path from opening the dashboard to verifying a remediated control.
Note
Compliance assessments run approximately every 12 hours. After remediating a failing control, wait for the next assessment cycle before the compliance dashboard reflects the updated status.
Assigning standards and communicating compliance posture.
How to assign other standards and integrate cloud infrastructure compliance data with Microsoft Purview Compliance Manager.
Assign compliance standards in the Azure portal
Standard assignment and policy configuration happen in the Azure portal not the Defender portal. The Defender portal provides a read-only view of compliance data, but you manage which standards to monitor through the Azure portal's security policy interface.
To assign a standard:
- Sign in to the Azure portal and open Microsoft Defender for Cloud.
- Select Regulatory compliance, then choose Manage compliance policies.
- Select your subscription or management group.
- Navigate to Security policies.
- Locate the standard you want to enable and toggle the status to On.
Standard assignment follows Azure Policy's scope hierarchy. When you assign a standard at a management group level, all nested subscriptions inherit the assignment and contribute to aggregate compliance tracking.
Microsoft Purview Compliance Manager
Is a solution that helps organizations automatically assess and manage compliance across their multicloud environments.
The security team configures standards and remediates findings in Defender for Cloud, while the legal and compliance team manages improvement actions and status in Compliance Manager.
Compliance Manager aggregates data from Microsoft 365, endpoints, cloud infrastructure, and on-premises systems into a single compliance view.
Assign and manage Azure built-in roles
| Step | Action |
|---|---|
| Identify the scope | Determine the narrowest scope where the user or workload needs access (resource, resource group, subscription, or management group) |
| Select the role | Choose the most specific built-in role that grants required permissions without excess privileges |
| Verify existing access | Check what permissions the user or managed identity from inherited or group-based assignments |
| Assign the role | Add the role assignment at the target scope using the Azure portal, CLI, or infrastructure as code |
| Remove broader assignments | Delete any over-permissioned assignments that the new, narrower assignment replaces |
Three general roles exist:
| Role | What it grants | When to use it |
|---|---|---|
| Owner | Full control including role assignment delegation | Only when the user explicitly needs to assign roles to other users or managed identities |
| Contributor | Full resource management without role assignment capability | Only when no service-specific role exists for the required operations |
| Reader | Read-only access across the scope | Audit, monitoring, and view-only scenarios where no modifications are needed |
Azure provides two types of managed identities:
- A system-assigned managed identity: Is tied to the resource's lifecycle when you delete the virtual machine, function app, or container instance, Azure automatically deletes the identity.
- A user-assigned managed identity: Use user assigned identities when multiple resources need identical permissions, or when the identity needs to persist after you replace or recreate the underlying resource.
Tip
Use the Access control (IAM) → Role assignments tab at the subscription scope and filter by "Type: User" to see all direct user assignments across the subscription. Sort by "Role" to quickly identify all Owner and Contributor assignments that need review.
Example: Assign Virtual Machine Contributor to a network engineer at resource group scope:
- Navigate to the resource group in the Azure portal
- Select Access control (IAM) → + Add → Add role assignment
- On the Role tab, search for and select Virtual Machine Contributor
- On the Members tab, select User, group, or service principal → search for the engineer's account
- Select Review + assign
-
Return to Access control (IAM) → Role assignments to verify the new assignment appears
If the engineer previously had Contributor at subscription scope, remove the over-broad assignment: 8. At the subscription scope, navigate to Access control (IAM) → Role assignments 9. Find the engineer's existing Contributor assignment 10. Select the assignment → Remove
Azure custom role structure
Azure RBAC custom roles use JSON definitions that specify exactly which operations are permitted or denied. Each property controls a different aspect of access.
{
  "Name": "ByteSoft VM Operator",
  "IsCustom": true,
  "Description": "Can restart and view logs for Azure VMs. Cannot create, delete, or modify VMs.",
  "Actions": [
    "Microsoft.Compute/virtualMachines/read",
    "Microsoft.Compute/virtualMachines/restart/action",
    "Microsoft.Insights/diagnosticSettings/read",
    "Microsoft.OperationalInsights/workspaces/read"
  ],
  "NotActions": [],
  "DataActions": [
    "Microsoft.KeyVault/vaults/secrets/getSecret/action"
  ],
  "NotDataActions": [],
  "AssignableScopes": [
    "/subscriptions/xxxxxxxx-xxxx-xxxx-xxxx-xxxxxxxxxxxx"
  ]
}
The Actions property lists control plane operations—creating, reading, modifying, or deleting Azure resources through Azure Resource Manager (ARM). These operations manage the resource itself, not the data inside it. In the example, Microsoft.Compute/virtualMachines/read allows viewing VM properties, and restart/action enables the restart operation.
NotActions creates exclusions from the Actions list.
DataActions controls data plane operations reading or writing data within a resource.
NotDataActions works like NotActions but applies to data plane permissions. It subtracts specific data operations from broader DataActions grants.
AssignableScopes defines where this role can be assigned the management groups, subscriptions, or resource groups that can use this custom role.
Create a custom Azure role through the portal
- Go to the subscription or management group where you want to create the role, then select Access control (IAM) from the left menu.
- Select + Add at the top of the page, then choose Add custom role from the dropdown.
- On the Basics tab, enter the role name and description. Choose whether to start from scratch, clone an existing built-in role, or upload a JSON file.
- On the Permissions tab, select + Add permissions to search for and add specific actions from the available resource providers. Switch to the JSON tab to edit the role definition directly if you prefer working with the raw structure.
- On the Assignable scopes tab, verify the scopes where the role can be assigned. By default, this includes the current subscription.
- On the Review + create tab, review the complete role definition, and select Create to save it.
Microsoft Entra custom roles a different system
Azure RBAC custom roles control access to Azure resources like VMs and storage accounts. Microsoft Entra custom roles control an entirely separate domain directory operations in Microsoft Entra ID.
Microsoft Entra roles manage:
- Users
- Groups
- Applications
- Conditional Access policies
- Directory settings.
| Characteristic | Azure RBAC custom role | Microsoft Entra custom role |
|---|---|---|
| Controls access to | Azure resources (VMs, storage, subscriptions) | Entra ID directory objects (users, groups, apps) |
| Created in | Azure portal (IAM) or ARM/Bicep templates | Microsoft Entra admin center |
| Permission source | Azure resource provider action namespaces | Microsoft Entra directory permission set |
| Assignable scope | Management group, subscription, resource group, or individual resource | Tenant-wide or specific application registration |
| Maximum custom roles per tenant | 5,000 | 100 |
CIEM for identity insights
Cloud Infrastructure Entitlement Management (CIEM) is a security discipline that discovers, analyzes, and governs identity permissions across cloud environments to enforce least-privilege access and reduce breach risk. CIEM platforms consolidate visibility into all cloud identities and entitlements in a single dashboard, helping organizations manage access across AWS, Azure, and Google Cloud.
Microsoft Entra access reviews
Access reviews are the formal mechanism for evaluating whether existing role assignments are still justified.
To create an access review:
- Go to Microsoft Entra admin center → Identity Governance → Access reviews → + New access review.
- Set Review type to Azure resource roles or Microsoft Entra roles depending on what you're reviewing.
- Select the scope: the subscriptions with the suspicious assignments.
- Select the roles to review: Owner, Contributor, or your specific roles of concern.
- Set Reviewers: manager (automatic from HR data), specific people, or the users themselves (self-review).
- Set Duration to 14–30 days (recommended for the first review).
- Under Upon completion settings, set Apply results automatically to Yes and set If reviewers don't respond to Remove access.
- Start the review.
Ransomware
Enable soft delete and immutable vaults
| Protection layer | What it prevents | Configuration commitment |
|---|---|---|
| Enhanced soft delete | Immediate permanent deletion of recovery points | Reversible or always-on (irreversible) |
| Vault immutability | Modification or deletion of recovery points before retention expires | Reversible or locked (irreversible) |
Soft delete: creates a safety net for deleted backup items. When backup data is deleted whether by an administrator, an attacker, or accidental user action the recovery points enter a soft-deleted state instead of being immediately purged.
- Soft delete retention: configurable from 14 to 180 days. The default is 14 days. Longer periods provide more time to detect advanced persistent threats before the recovery window expires.
- Always-on soft delete: makes the retention period itself irreversible. Once enabled, no user including Global Administrators can reduce or disable the retention period on that vault.
To enable enhanced soft delete in the Azure portal:
- Navigate to your Recovery Services vault
- Under Settings, select Properties
- Under Soft delete, select Update
- Set the retention period—choose between 14 and 180 days based on your detection and response capabilities
- Check Enable always-on soft delete to make soft delete permanent on this vault
- Select Save
Vault immutability prevents backup policies from being modified in ways that reduce recovery point retention, and prevents backup data from being deleted before the retention period expires.
WORM: (Write Once, Read Many)
Immutability operates in three states:
- Disabled: No protection the default state for existing vaults. Administrators can modify policies and delete data freely.
- Enabled (reversible): Immutability is active. Recovery points can't be deleted, and policies can't be modified to reduce retention. This setting can be disabled if organizational requirements change.
- Enabled and Locked (irreversible): Immutability is permanently active and can't be disabled by any user, including Global Administrators. Permanently active is the WORM compliance state.
To enable and lock vault immutability:
- In the Recovery Services vault, navigate to Settings > Properties
- Under Vault immutability, select Update
- Select Enable vault immutability
- To lock permanently, select Apply vault immutability lock
- Read the confirmation warning carefully—this action is irreversible
- Confirm the operation
Configure Multi-User Authorization and RBAC for backup
- Multi-User Authorization (MUA)
| Operation | Single admin (no MUA) | With MUA |
|---|---|---|
| Shorten soft delete retention window | Vault admin executes immediately | Vault admin requests, Resource Guard owner approves |
| Stop backup with data delete | Vault admin executes immediately | Vault admin requests, Resource Guard owner approves |
| Remove MUA protection | Vault admin executes immediately | Vault admin requests, Resource Guard owner approves |
MUA converts single-credential attack scenarios into multi-credential collusion requirements. A compromised backup administrator credential alone can't destroy the backup infrastructure.
Configure MUA
MUA configuration involves three roles:
- The security administrator who creates and manages the Resource Guard.
- The vault administrator who manages backup operations
- The Resource Guard owner who approves critical operation requests.
Step 1: Create the Resource Guard (security administrator account)
The security administrator creates the Resource Guard in a subscription separate from the Recovery Services vaults:
- Sign in to the Azure portal with the security administrator account
- Search for Resource Guards and select the service
- Select + Create
- Choose a subscription different from the one containing your Recovery Services vaults
- Select or create a resource group—use a resource group dedicated to security infrastructure
- Provide a name for the Resource Guard (for example, rg-backup-security-prod)
- Select the region—must match the Recovery Services vault's region
- Under Protected operations, review the default selections—all optional operations except Restore are enabled by default; deselect any that don't require two-administrator approval in your environment
- To require approval for restore operations, select Restore (disabled by default)
- Select Review + create, then Create
Step 2: Assign the vault admin as Reader on the Resource Guard
The vault administrator needs read access to the Resource Guard to see that it exists and to submit approval requests. They must not have Contributor, Backup MUA Admin, or Backup MUA Operator permissions on the Resource Guard—any of these roles allow self-approval of critical operations.
- Navigate to the Resource Guard you created
- Select Access control (IAM)
- Select + Add role assignment
- On the Role tab, select Reader
- On the Members tab, select the vault administrator account or the service principal used for backup operations
- Select Review + assign
Step 3: Configure the vault to use MUA
The vault administrator configures the vault to enforce MUA using the Resource Guard:
- Sign in as the vault administrator
- Navigate to the Recovery Services vault
- Under Settings, select Properties
- Under Multi-User Authorization, select Update
- Select Protect with Resource Guard
- Use the cross-subscription resource picker to select the Resource Guard created in Step 1
- Select Save
Backup RBAC roles, minimum privilege for backup operations
| Role | Operations permitted | When to use |
|---|---|---|
| Backup Contributor | Full backup management including stop backup with delete, manage policies, register servers, create vaults | Initial vault setup and configuration; accounts that need full backup administrative control |
| Backup Operator | Same as Contributor, however they can't stop backup with data delete, can't disable soft delete, can't delete backup data | Day-to-day backup operations including triggering backups, monitoring jobs, restoring data |
| Backup Reader | View all backup configurations, job status, and recovery points; no modification permissions | Monitoring dashboards, compliance auditing, SOC review, helpdesk troubleshooting |
For automated backup management (service accounts, automation runbooks, Azure Functions), use Backup Operator.
Implement security controls in IaaC.
Scan IaC templates using Microsoft Defender for DevOps
Microsoft Security DevOps (MSDO)
Infrastructure as code templates define security configurations before resources exist. Scanning them in the pipeline catches misconfigurations when they're cheapest to fix—during code review, not after deployment.
Connect GitHub and Azure DevOps to Defender for Cloud
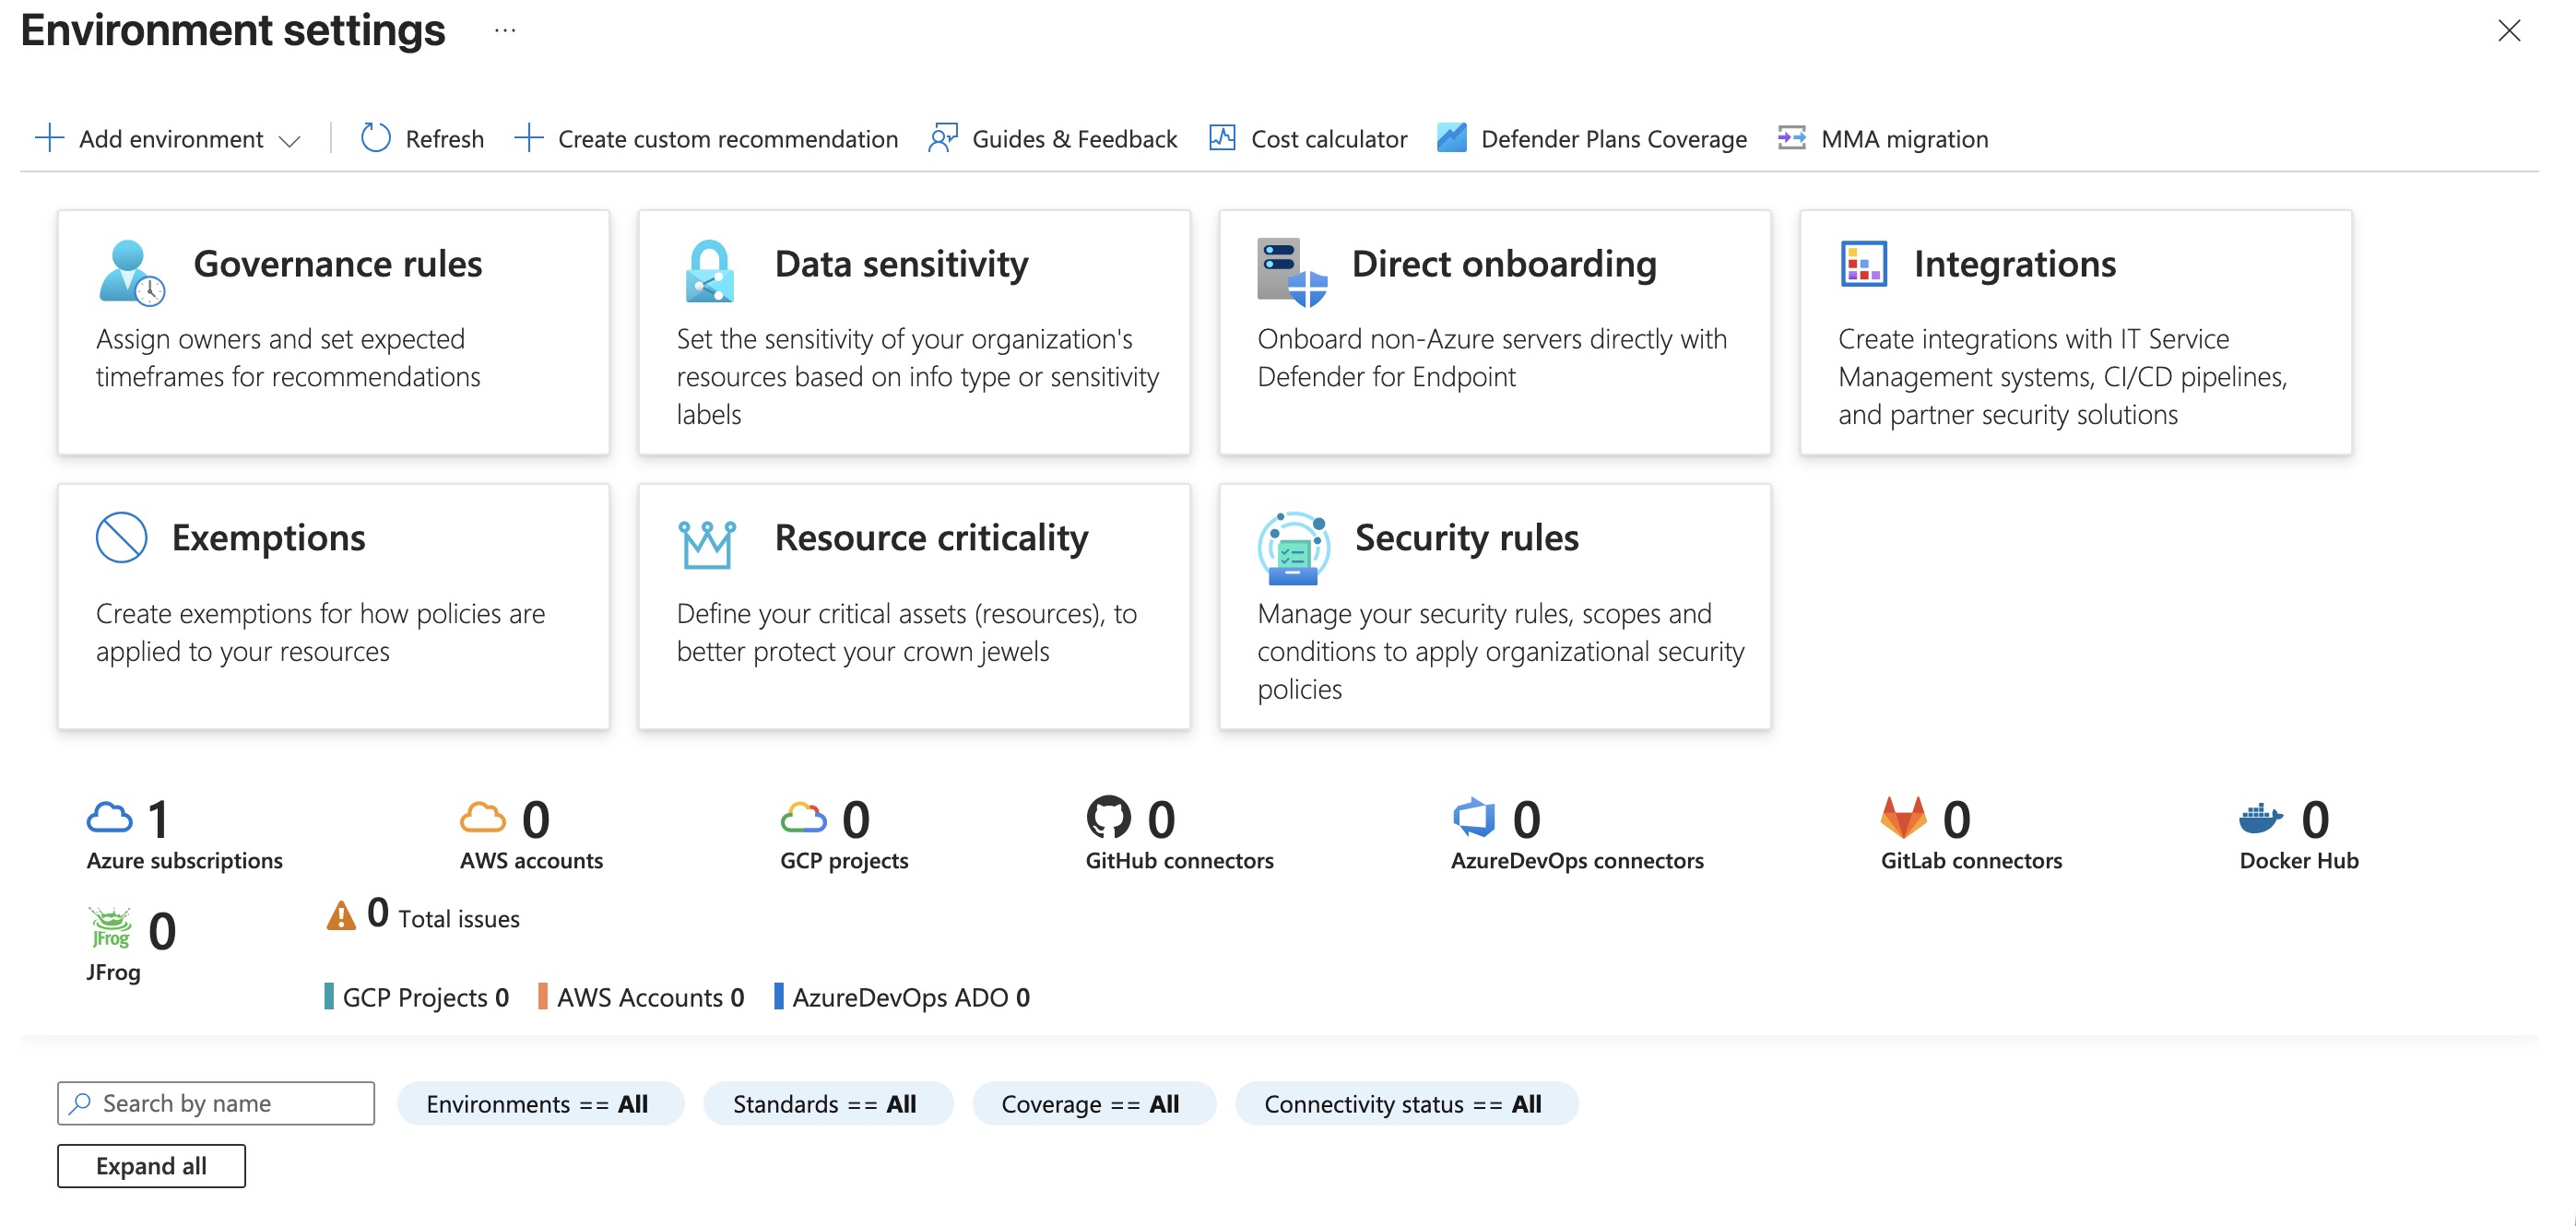
To enable the connection, go to Defender for Cloud → Environment settings → + Add environment → choose GitHub or Azure DevOps.
Microsoft Security DevOps (MSDO) is an extension that runs security analysis tools directly in the CI/CD pipeline. It's available as a GitHub Action and as an Azure DevOps task, making it compatible with both major source control platforms.
GitHub Actions example:
- name: Run Microsoft Security DevOps
  uses: microsoft/security-devops-action@v1
  with:
    categories: 'IaC'
Azure DevOps Pipeline example:
Note
Pin the action to a specific version tag (such as v1) rather than @latest. Pinning prevents unexpected breaking changes from new releases silently affecting your pipeline
Scannnig engines
Policy-as-code for everyone | Open Source : Checkov uses a common command line interface to manage and analyze infrastructure as code (IaC) scan results across platforms such as Terraform, CloudFormation, Kubernetes, Helm, ARM Templates and Serverless framework.
Enterprise Policy as Code (EPAC) managing at scale
EPAC is an open-source PowerShell module that manages Azure Policy at management group scale through a CI/CD pipeline.